Hot Water Temperature Regulator

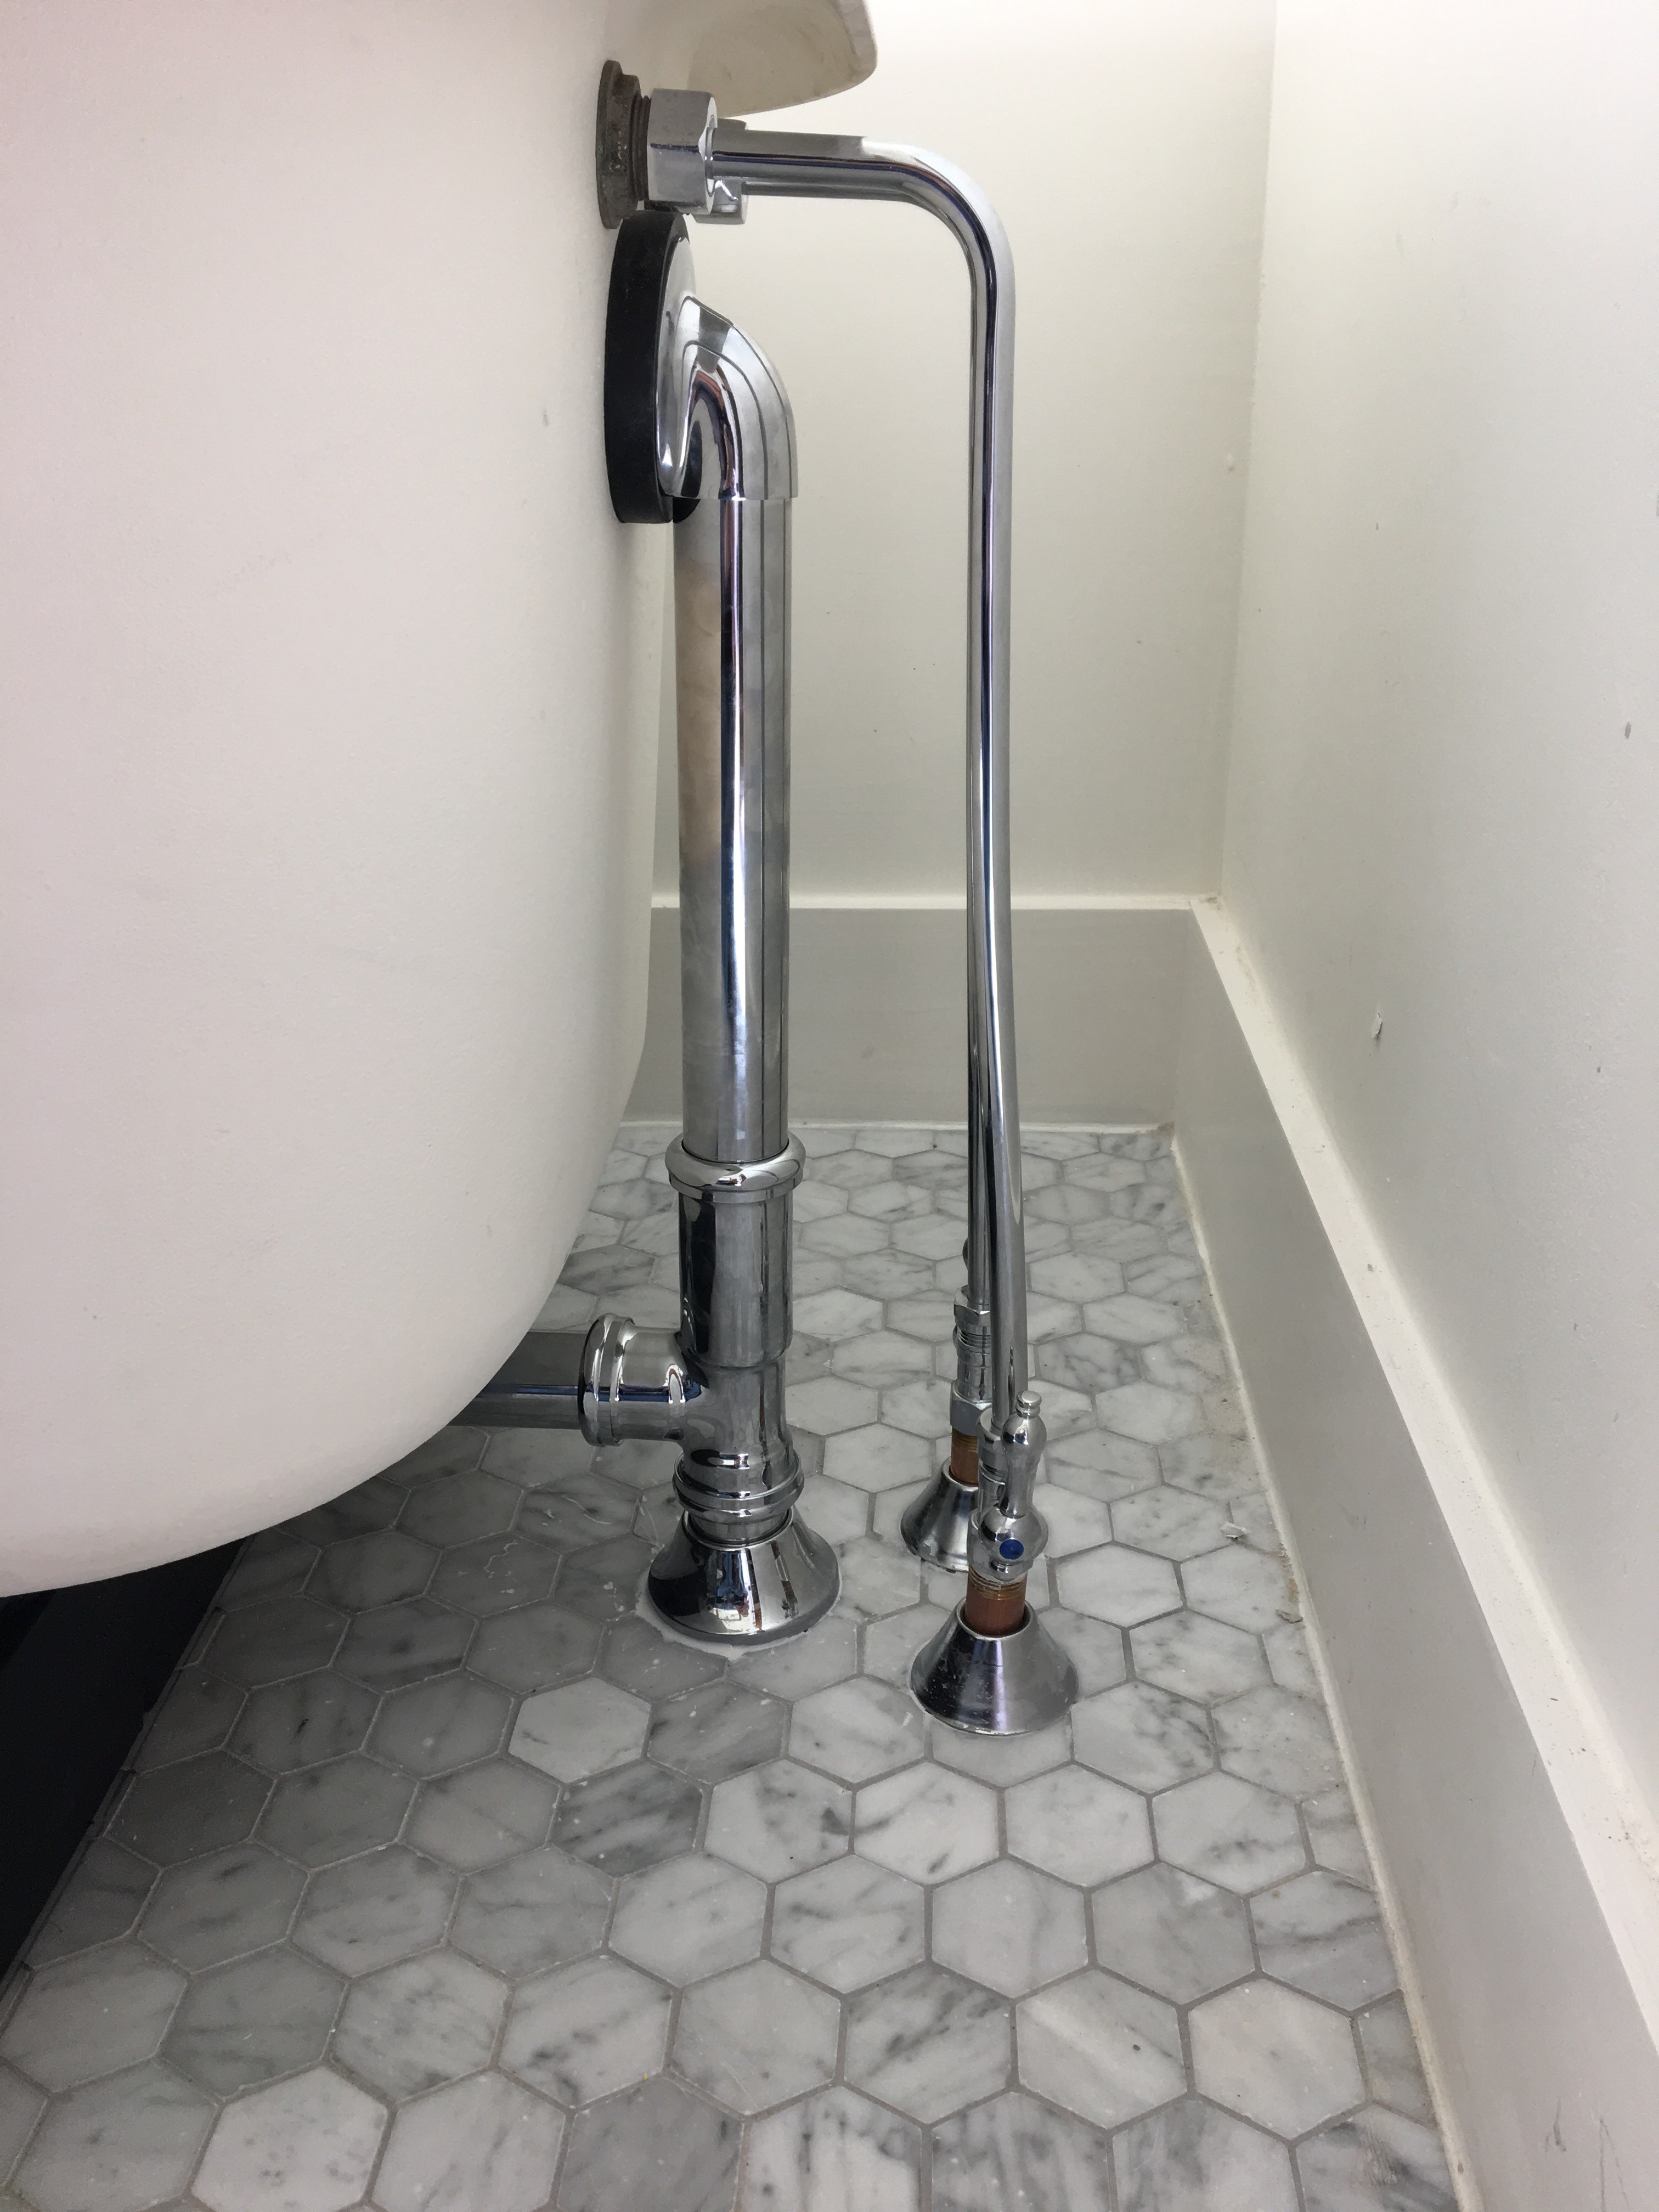
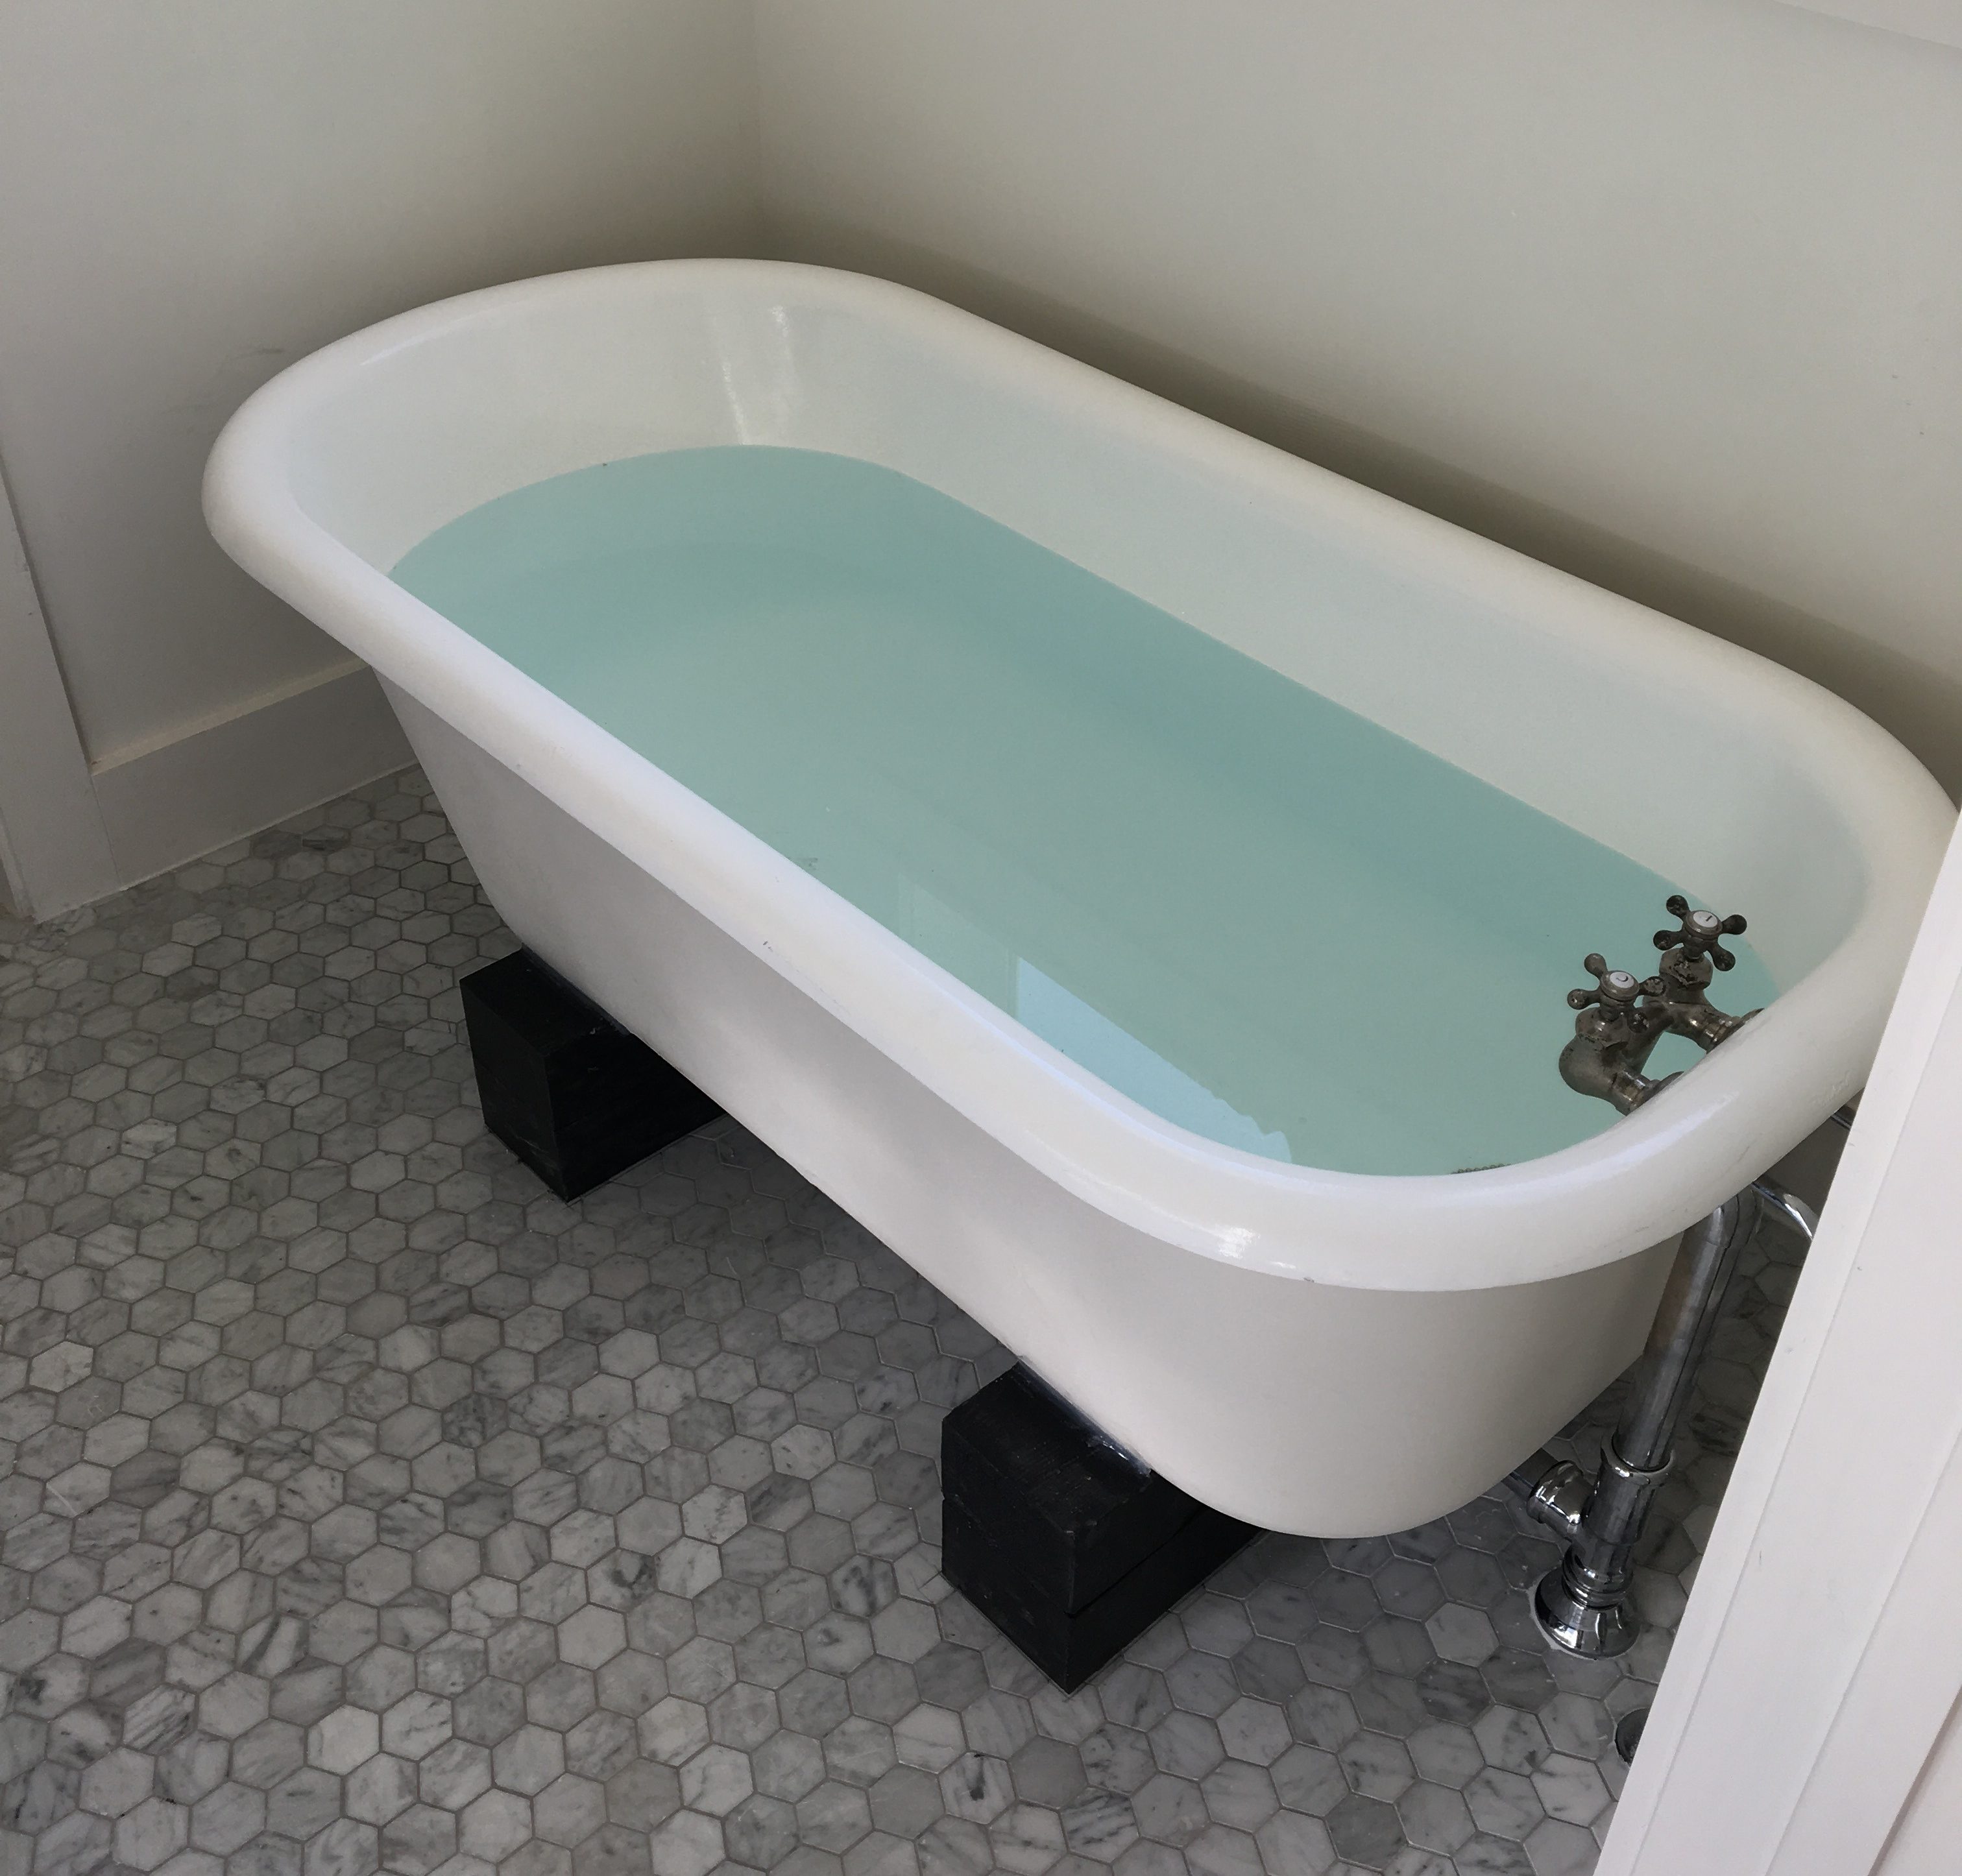
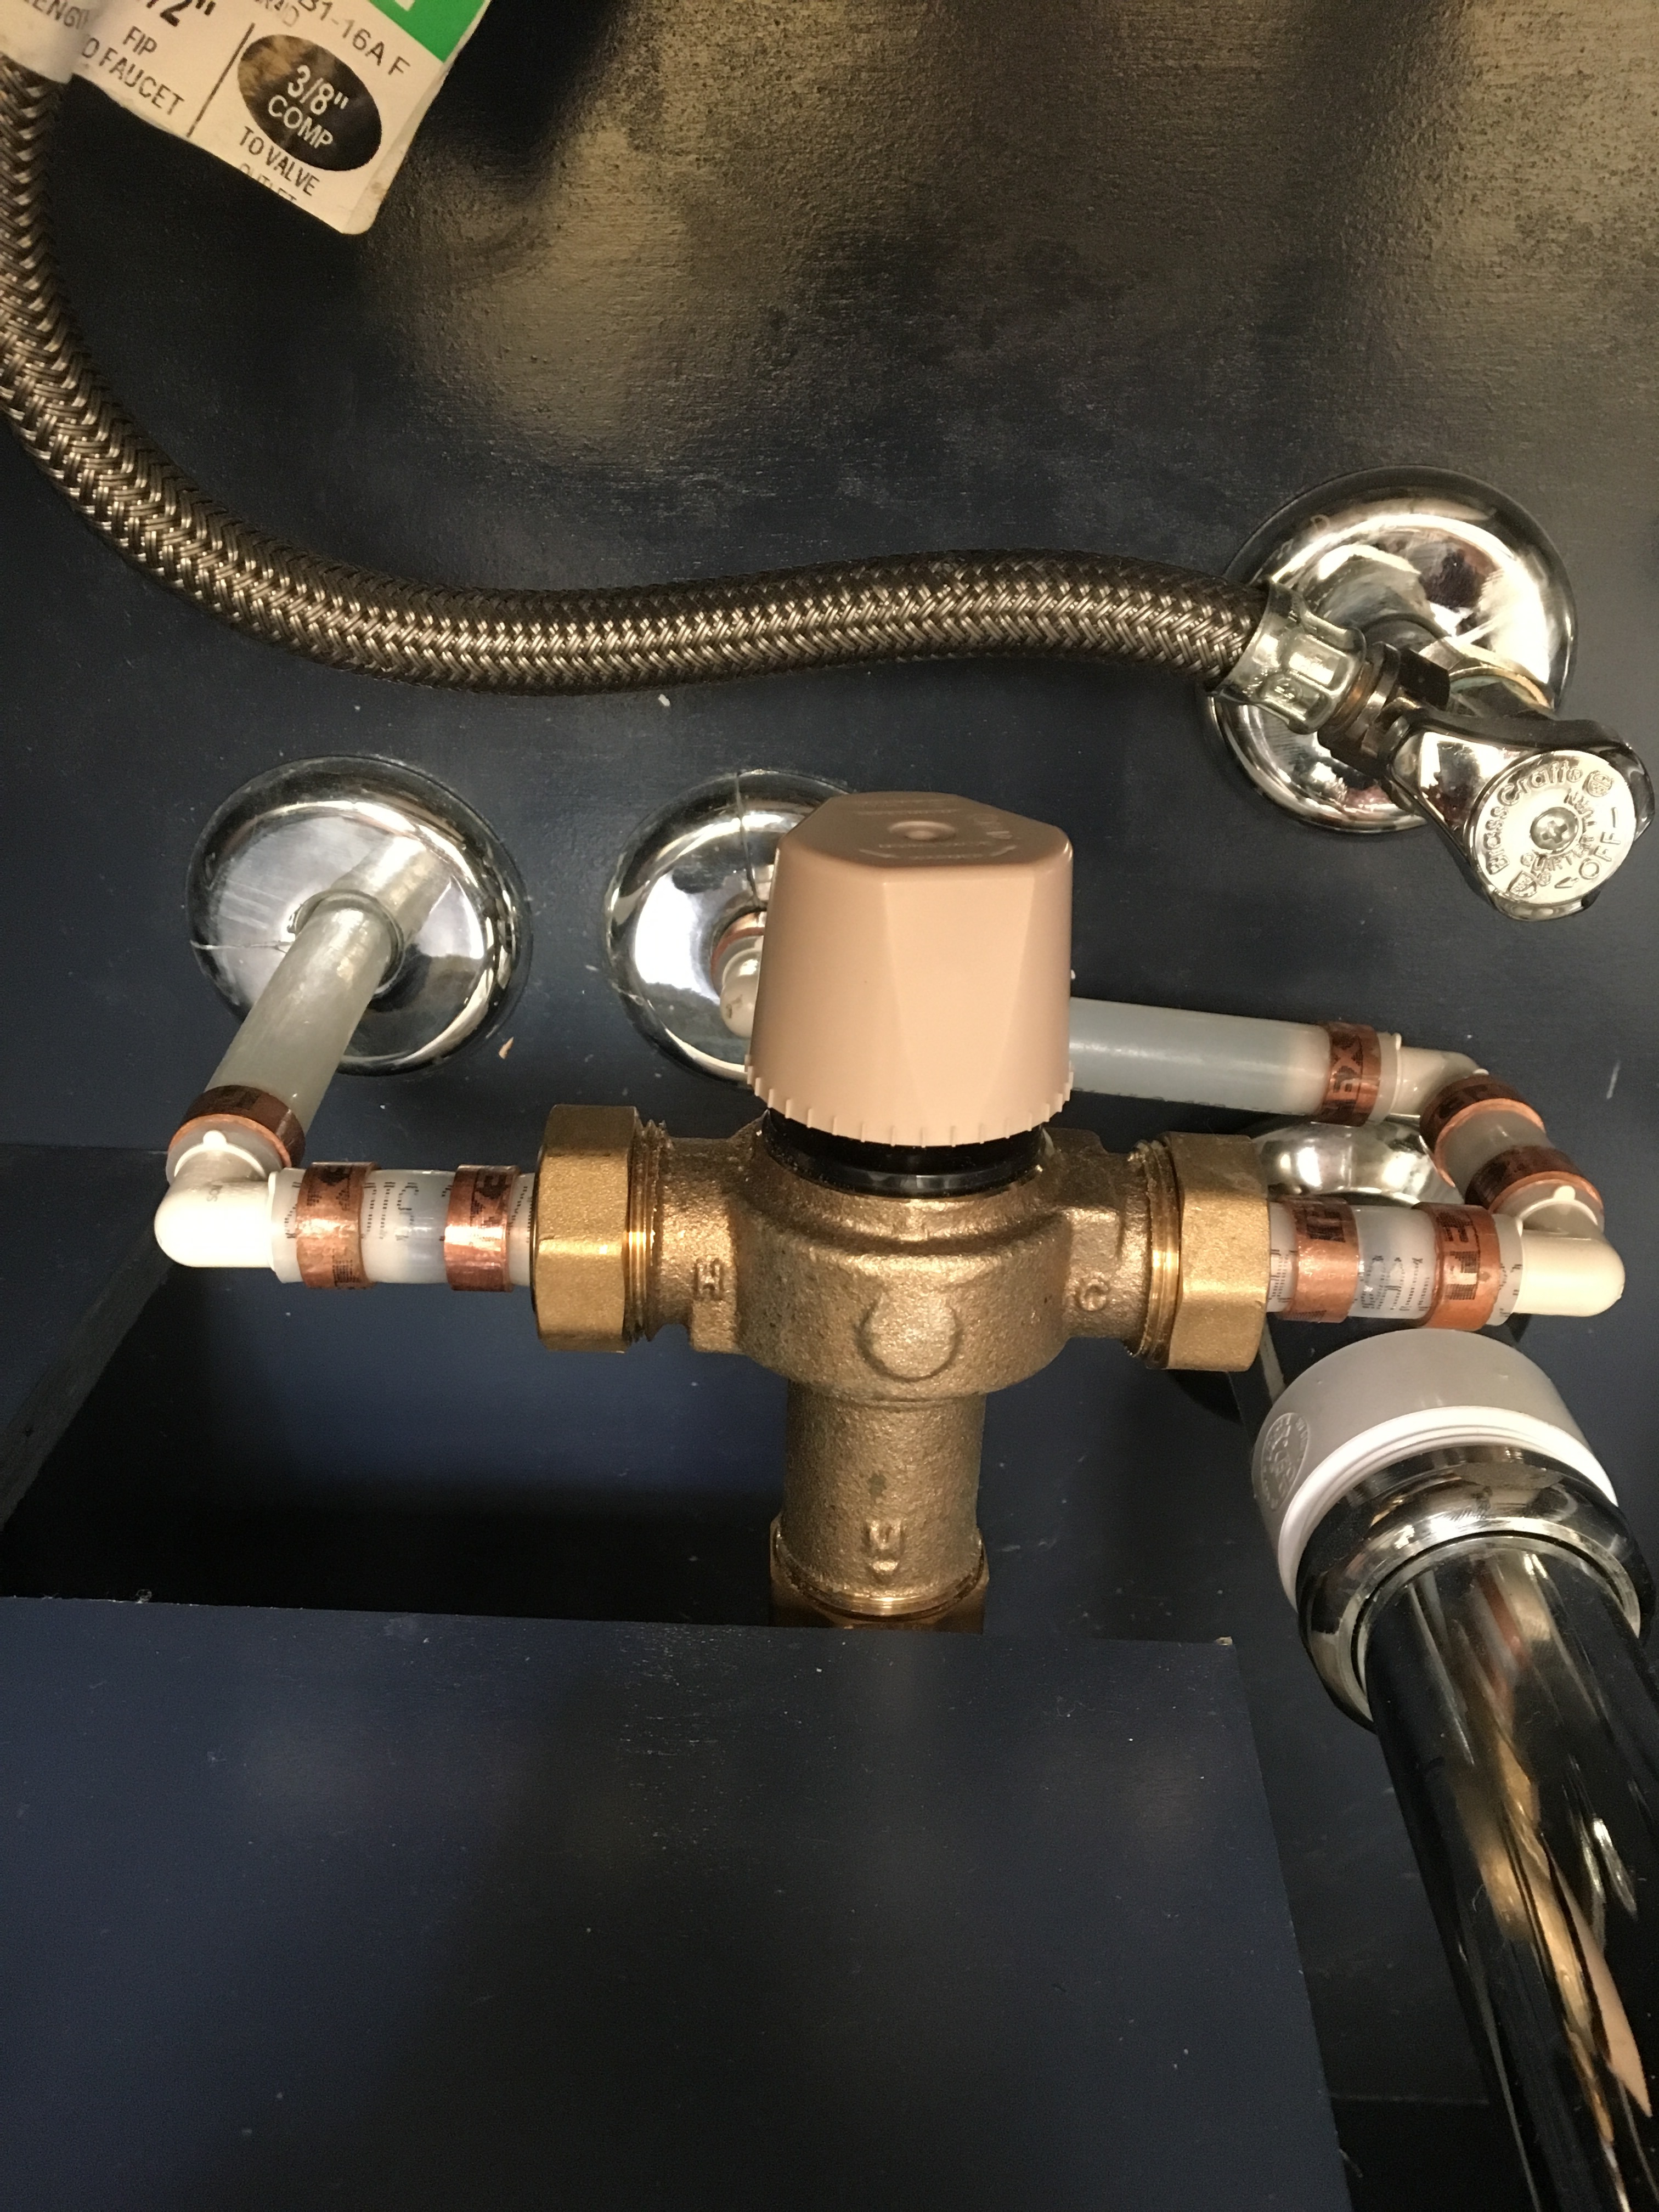
The hot water to the tub was not hot enough. So, we cranked up the temperature on the water heater, but it didn’t seem to help. The water at the sink was unquestionably hotter than at the tub, which was nearby. Finally, we found this temperature regulator under the sink which controlled the hot water to the tub. It has an adjustment valve that allows you to change the blend and turn up the heat. Problem solved. 

Watts Temperature Regulator

Here’s the description from the manufacturer’s website

“How They Work
Upon use of tempered water, a thermostat in the mixing chamber of the valve senses the outlet temperature. The thermostat automatically positions a seat assembly which controls the flow of hot and cold water supplied to the mixing chamber. If the mixed outlet temperature increases, the thermostat will expand moving the seat assembly to allow the cold water inlet port to open more fully and at the same time restricting the hot water inlet port. Conversely, if the mixed outlet temperature decreases, the thermostat will contract moving the seat assembly to allow the hot water inlet port to open more fully and at the same time restricting the cold water inlet port. In both cases the mixed outlet water temperature is automatically and continually maintained at the preset temperature within the tolerances of the valve. In the event of a cold or hot water supply failure, the seat assembly moves to an extreme position shutting off the hot or cold inlet water port. A mechanical adjustment permits selection of the desired outlet water temperature within range of the valve.” www.watts.com

Endless Hot Water – The Tankless Option

We chose a Rinnai tankless water heater with a recirculation pump, instead of a traditional water heater.  I think the recirculation pump is the “coolest” feature of all, and I’ll describe it later.  The unit is natural gas fired, and mounted on an exterior wall in the garage. Our Model is a Rinnai RUR98.  

Here is a picture of the unit installed. As you can see it vents directly outside, so there is no need for a separate through-the-roof exhaust vent. And its easily accessible from the outside, in case of repairs or adjustments.

Rinnai RUR98 Tankless Water Heater


The heater comes with an external digital controller, shown here, which sits inside the garage on top of the metal case which encloses the water heater. Apparently, there is an option to add a wireless controller, which we have not yet done.

Controller Model MC-195T-US


One of the best features is the recirculation pump, which is built into the unit.  Since, this house was a new build, our plumber installed a hot water recirculation loop which runs to each bath and sink. That way, when the reciculation cycle is on at the heater, you have nearly instant hot water, similar to what you find at nice hotels.

The controller has a setting where you can configure the daily time for the recirculation pump to run, typically in the morning and at night. Or, you can just manually turn it on from the controller. When the unit is recirculating, it is clear that the heater is firing, so you do pay an energy demand price for the instant hot water. 

We are still playing with it all.  I am not yet sure of the energy use, especially with the recirculation pump running.


Yard Fencing

For the garage side of the yard, we choose a hog-wire style open fencing, with a simple gate. It’s pictured below. There are vines planted, which will grow up the fence sides.  Hopefully, the open style will get some sun to the grass, and it can grow a bit, so the dogs will have something to play on.

Hog Wire Cedar Fence


Hog-Wire Gate

Cast Iron Tub Installed

Here is the tub installed. We decided to place it on some surplus beams, rather than the traditional claw feet. The beams will protect the tile flooring and are really more stable and a nicer finish than the feet. The but sports the refurbished old nickel faucet, and it’s full of water to test the drain plug (which obviously works).

Below is a close up of the fine stainless steel plumbing connecting the tub to the water and drain. It really turned out well!

Stainless Steel Pipes
Cast Iron Tub

Cast Iron Claw Foot Tub

Yep, it’s a 5 footer
The Tub

Clawfoot tub in its native habitat (e.g. discarded in a field).


About the time the foundation was being poured, we made a visit to the Clawfoot Tub Doctor, located near Brenham, Texas to see about purchasing an old cast iron tub.  Mike, the owner (and resident tub doctor), showed us the inventory scattered through his field.  We selected a 5 footer, which had an old nickel fixture, and made a deal with Mike to refinish it all. He worked more quickly than we did and the tub was ready in about a month, with new white enamel and a working fixture.

Picking Up the Tub

With Mike’s help we loaded the tub onto the bed of our F-150, with his forklift. We then drove it back to the house, where I had a couple of burly guys waiting to help us unload. I would guess the tub weighted about 200 – 250 pounds, and could be managed by two strong fellows.

Wood Cradle

My wife decided to remove the antique claw feet, and our carpenters prepared a wood cradle from some scrap wood from another project. It’s not yet installed — I will post another picture when were are finally done.

Made in the USA
Standard Sanitary Mfg. Co. Louisville
Manufacture Date 2-25-1927

Made in the good old USA and, yes, it really is “old” — 1927.


Electric Service Challenges

There is a temporary electric meter set by our utility provider for construction, but getting the permanent power was more of a challenge than we expected. The old house had the electric meter on the front of the house, which was less than 100 feet to the transformer on a nearby telephone pole.  We designed the new house with the meter at the back of the garage, to keep it out of sight and we planned to put the electric line underground for safety and aesthetics.

Old Transformer (background) and Pole to be replaced

Well it turned out that we should have consulted our electric provider earlier in the process.  Running the power to the garage was a longer distance than the utility preferred, due to line resistance and potential power “sag”. The extra distance was about 70 feet or so, which on its face does not seem like much.  While I never got a clear answer on the maximum distance the meter should be from the transformer, it seems like anything over about 150 feet poses potential problems. The distance is a function of a number of variables including, size of the transformer, size/resistance of the service line, and customer power demand.

Trenching for Conduit

Also, running the service line underground required the utility company to replace a telephone pole on the corner of our yard, so that all the utilities (including cable/internet) could be properly dropped down the side of the pole. Time for the new pole and transformer upgrades were 6 – 8 weeks, given the utility’s heavy work schedule.  Also, trenching for the new conduit had to be carefully planned to avoid running too close to an existing large pecan tree.

Conduit Connections to Meter Drop
Conduit, Installed

So, all of that caused us to have to re-juggle our schedule for landscaping and related work on the site.

Now we are just awaiting our utility to come and pull the wires through the new underground conduit.

Bricks – Chimney, Fireplace and Porch

The exterior of the house is board and batten, but there are some brick details.

  • Here are the finishing touches going on the chimney.
    Finishing the Chimney

    Glad to get that finished, since there was a portion of the metal roof which was waiting on the chimney to get completed.


  • And, here is the fireplace. Very nice. (Just ignore the trash inside the firebox, guess the workers were storing some of the work plans there.)

    Fireplace.


  • The front porch has a brick border, and the brick skirt.
    Front Porch

    Here is a close up also showing the support columns and how the brick is laid so that it hides their metal brackets.


Dry Wall

Great Room, taken from Second Level

With dry wall going up, its starting to look like a real house.  Here are some interior shots.

Garage with Sheet Rock
View Towards Second Level, taken from Front of House

Here is the great room, shot from the upper level.

Insulation, and Lots of It

Insulation. It’s not just for thermal resistance and minimizing energy consumption, though that is what first comes to mind.

Insulation – Interior

We used a variety of insulation materials. Exterior 2×6 walls got R-19 fiberglass batten insulation. Interior walls got R-11, primarily for sound-proofing. Amazingly, the batten insulation is so light that it was merely packed in and hung between the interior studs, prior to the dry wall going in.

And, the framing between the second story and the first floor likewise was insulated, for sound-proofing.

Ceiling Spray Foam

Ceilings received R-38 spray foam insulation. As you can tell from this picture, the spray foam is much better at filling all the gaps in the walls, and hence overall a much better insulating material.


Insulation – Garage

And, finally, you may wonder — do you insulate the garage? For a custom home, the answer clearly is “yes.” As long as you have the crews on site and the walls open — as my builder says — the cost is “pennies” (er, well perhaps dollars).  But, you get the idea.

Next stop, dry wall.